Showing posts with label Cooking. Show all posts

Monday, February 4, 2013

Homemade Coffee Creamer

My husband and I have always been coffee drinkers, but now having a baby in the home it has definitely become a necessity. My husband enjoys his coffee black, but as for me I have to have something to put in mine so while I was on Pinterest recently I came across this simple recipe for French Vanilla Creamer and had to try it out. This is all you will need......


  • 14 oz Sweetened Condensed Milk
  • 14 oz Milk (any kind whole, low fat, or skim)
  • 2 tsp Imitation Vanilla or Vanilla Extract
  • A container to put it in


Now put all your ingredients in your container and 
shake....and shake some more.......


Viola!! Now not only do you have a delicious creamer, but you also know what's in it! I hope you enjoy!


Wednesday, August 29, 2012

Farm Raised Chicken For Sale

We are offering some of our farm raised chicken for sale. These are the Jumbo Cornish X's we raised in the spring.

We will be selling them for $1.99 a pound.


We have been cooking at least one of these a week and they are great!

Send us an email or give us a call If you would like some great home grown local chicken.

These chickens were given no hormones, injections or medication of any kind. There had access to grass and bugs and all the grain feed they wanted.


Tuesday, March 13, 2012

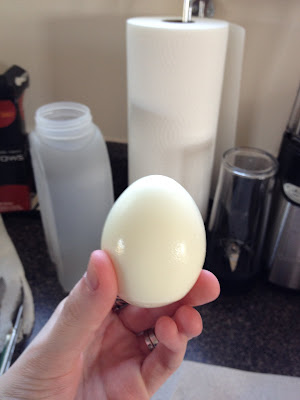
Tips on peeling fresh eggs and adding a little color to your deviled eggs!?!

If you have laying chickens like us you have at some point come across trying to peel your fresh eggs and boy is it a pain considering they usually never peel right. Some people like to play the waiting game when deciding to hard boil eggs and use the oldest batch they have but sometimes that still doesn't cut it when it comes time to peel them! If your making egg salad it's not that big of a deal but deviled eggs can be impossible!! If your like us you have also looked online for all sorts of ways to peel them. For example some people say if you add vinegar to the water it makes a difference or when you go to peel them use hot water...etc! Unfortunately none of these really work but thankfully I have found the key!!! I have done this only two times but both times I have had no problem peeling the eggs! So here are the steps...ENJOY!
1) Be patient I say this because there are a few steps in the process but it is worth it...So no skipping steps because every step is important.
2) Poke a whole in the end of every egg
3) Place the eggs in the bottom of your pot; do not stack them on top if each other only put enough to fill the bottom of the pot
4) Pour cold water over the eggs leaving an inch of water over the eggs
5) Bring to a boil and let boil for 10 minutes
6) Put the eggs in a bowl of ice cold water for 1 minute
7) Place one egg at a time in simmering water for 10 seconds which is just enough time to take one out and put one in
8) Do not wait for eggs to cool off peel them under running warm water
TADA!
Also I'm not sure how many of you are familiar with the website pinterest but it is a site full of DIY ideas! While on there one day I saw where someone had a picture up of dyed deviled eggs. After reading the blog behind the picture the woman said it was a family tradition that every Easter her mother would make these colorful deviled eggs for her and her siblings! So since we are about to start a little family of our own I thought I would try this out and see if it was something I could easily do as a family tradition for us. Also I wanted to see for myself if it effected the taste of the deviled eggs!
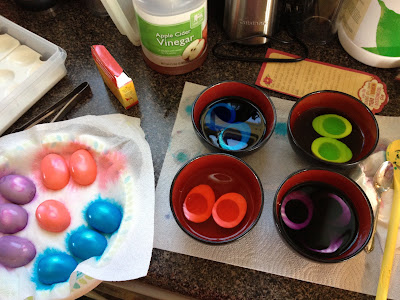
As you can see once I sliced and took out the yoke that's when there ready to dye. I used neon dye because that's what I had but for Easter I would use pastel dye. On the back of every dye box there's directions on how to dye Easter eggs and that is what I used minus the boiling water instead I just used hot water which worked fine. After letting them sit in the dye for 5 minutes I put them on a paper plate with a paper towel face down so the dye wouldn't sit in the hole. After doing this a couple times I waited a bit to let the dye dry. How to make sure it's dry enough is to just touch it with your fingers and see if it turns them that color, if not they should be fine. Double check the centers though and if they seem like there still wet use a paper towel and gently blot them, a little color is fine.
Expect them to be darker in the center and maybe even look wet but they're not its just from the dye. Next step is to fill them as you'd like! Also if your wonder why I didn't let them continue drying in the egg tray it is because I didn't want to get dye all over my trays and it makes people think twice about eating it if it's leaving dye on everything!
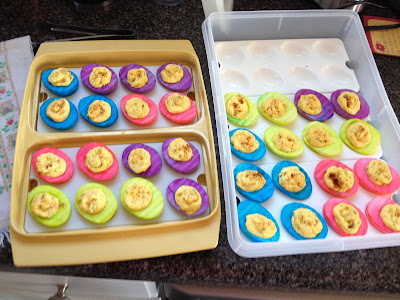
And here they are! I am thankful to say they passed the taste test and didn't have even a hint of vinegar flavor! Also I used apple cider vinegar because that was all I had and it still had no effect on the taste! For my first time ever making deviled eggs they turned out to be colorfully delicious!

Monday, December 5, 2011

Smoked Turkey Thanksgiving #2

We have been packing and moving the last few weeks and are now settled in at the In-Laws(Tabs Side). Long story short it was a pain!

I have been wanting to cook a turkey since I never have and i figured there was no reason to only have the Thanksgiving meal once. We don't get any leftovers from thanksgiving since we go to someone elses house. I went to the store on Saturday and they had their large birds half off. So I bought a 24.5 lb bird for $9.68. Once I got home I realized that a bird that big cooked on the smoker would stay in the 40 - 140 danger zone too long. So I cut the bird up and smoked it that way. I was just so tired of getting dry baked turkeys all my life that I had to find a better way. It cooked quicker than I expected(I usually just smoke ribs and butts). The breast turned out pretty good. They were a little too smokey but with gravy on them were perfect. All very tender and moist. The legs were okay. I think i should have left them on a little longer. The skin felt crispy but was more like leather to chew. It was still way better than a baked turkey. Next time I will use less smoke and a little higher temperature. I left for church after I put it on so it didn't get as much attention as it might have needed while cooking.


1204111226.jpg
1204111417.jpg1204111556.jpg

Tuesday, August 9, 2011

Smoking A Butt

About once a month I fire up the smoker and smoke something. Sometimes its a butt(Pork Shoulder), a whole chicken(I'm praying one day it will be roostie), ribs, jalapenos, fish, deer snack sticks or jerky. This past weekend it was a butt. It's usually a butt because it produces the most food with the least amount of work. It takes the longest but requires only that I check the temperature every few hours. This time of year when it is this hot I don't like smoking as much. I really enjoy BBQing in the winter more and that's when I do it the most. I have come a long way since I first got the smoker on Craigslist about 2 or 3 years ago. Nothing that comes out of the smoker is going to taste bad but it definitely needed some perfecting. The main thing I realized is you can't rush it. It's done when it's done, not necessarily when you are ready to eat. So this time I decided to let the smoker go all night while we slept and hopefully the BBQ would be ready when we got home from church the next afternoon.
I started off getting some charcoal nice and hot in the chimney starter. This is way better than using lighter fluid. A lot of people say they can taste the lighter fluid but I can't. I just find that it is a lot easier and faster doing it this way. Probably safer too.

After they get nice and hot I dump them in the smoker's fire box and add some wood. I usually use hickory but lately I have been using dogwood from a tree that died in my yard. I really like the flavor too.

Another new thing I have been doing the last dew times is soaking the butt in a brine. It consist of 2 Quarts of water, 2 cups of Pickling salt and about a cup of molasses. I let this soak for about 6-8 hours then pat dry and apply your dry rub. I have been using "Bone Sucking Sauce" Dry rub.
 Now that the fire is stoked and the meat is seasoned I wait. This time it ended up taking about 16 hours. That's probably a few hours longer than it should have but it's hard to keep an eye on the temperature when you are sleeping. It still beats cooking all day and then its still not ready by dinner time.
Finally it is done. I gave it about 30 minutes to cool down and then pulled it apart. The last time I made it we used the mixer with the dough attachment and shredded it really fine.


This time I just pulled it in chunks. Either way will work. I also made some Cole slaw to go with it.

(Notice the color of the meat in this picture and there is no sauce on it)


I have not perfected my own sauce yet but I am working on it. Every time I make it it taste awful. The last time I made it was the best yet but still not great. So since I spent 16 hours cooking I wasn't about to make my own sauce again and I don't really like any of the store brands that much I decided to go to a local BBQ place that was featured on the Food Network show "The best thing I ever Ate" and buy some of their homemade sauce. It was a good choice and the BBQ was great. I've really got the meat cooking part down I just need to practice more on the sauce.

Wednesday, August 3, 2011

Squash and Ricotta Pie

A few months ago I saw on another blog a recipe for a Squash and Ricotta Galette. I'm not french and I certainly don't cook like I am so I wont call this a Galette(the french word for a stuffed pie crust.) Plus I had to look up what Galette meant so I knew what I was trying to cook. It sounded really good and not too hard so I tried it. Well I'm not a baker and I really didn't enjoy trying to make a homemade pie crust. The main reason was it called for a pastry cutter. I had no idea what that was so after I looked it up i realized I didn't have one I just used a fork and the end of a whisk. I thought it worked ok. In my opinion it was just too messy and too much work to make the pie crust so next time I will just by one. The filling was really easy. It was just ricotta, mozzarella and Parmesan. A little olive oil and garlic too. You just add the filling to the pie dough, top with squash and fold the edge over. He are some pictures of mine.


The Filling

Pie dough with Filling

Wrapped with egg wash brushed on

Finished

Eaten!

It was very good though. By not using the pastry cutter i don't think the butter in the crust was in small enough pieces. The crust was flaky but only in places. A lot of the butter cooked out and made the whole thing a little too buttery for me. That's why next time I will use the store bought crust. I think in would be good to do everything the same and then top it with a little more parm and mozzarella.


 For the crust:


1 1/4 cups all-purpose flour, chilled in the freezer for 30 minutes

1/4 teaspoon salt

8 tablespoons (1 stick) cold unsalted butter, cut into pieces and chilled in the fridge

1/4 cup sour cream

2 teaspoons fresh lemon juice

1/3 – 1/2 cup ice water

Filling:

1 large summer squash, sliced into 1/4 inch rounds

1 tablespoon plus 1 teaspoon olive oil

1 clove of garlic, minced

1/2 cup ricotta cheese

1/2 cup (1 oz) grated Parmesan cheese

1/4 cup (1 oz) shredded mozzarella

1 tablespoon basil, torn or cut into ribbons


Glaze:

1 egg yolk beaten with 1 teaspoon water
Dough:

Whisk together the flour and salt in a large bowl, then stick into the freezer until well-chilled. Cut a single stick of butter into small cubes and refrigerate to ensure they are not softened. When the flour mixture and the butter are both chilled, pull them out and combine in a single large bowl. Using a pastry cutter, cut the butter into the flour until the butter pieces are the size of small peas.

In a separate small bowl, whisk together the sour cream, lemon juice and water and add this to the butter-flour mixture. With your fingertips or a wooden spoon, mix in the liquid until large lumps form. Lightly pat the lumps into a ball, being careful not to overwork the dough. Cover with plastic wrap and refrigerate for 1 hour.
Filling:

Lay the squash out over several layers of paper towels. Sprinkle with 1/2 teaspoon salt and let drain for 30 minutes. Gently blot the tops of the squash with a paper towel. In a small bowl, whisk the olive oil and the garlic together and set aside. In a separate bowl, mix the ricotta, Parmesan, mozzarella, and 1 tablespoon of the garlic and oil together. If your mozzarella or parmesan are salty, you can skip any additional seasoning. If they’re not, season with salt and pepper to taste.
Preparing your tart:
Preheat oven to 400 degrees. On a floured surface, roll the dough out into a 12-inch round (using a rolling pin or a clean, empty wine bottle). Line a baking sheet with parchment paper and transfer the dough onto the baking sheet. Spread the ricotta mixture evenly over the bottom of the dough, leaving a 2-inch border. Starting from the outer edge, tile the squash rounds just on top of one another in concentric circles until the ricotta mixture is covered. Drizzle the remaining teaspoon of the garlic and olive oil mixture over the zucchini. Fold the dough’s edge just over the filling (the center of the tart will be exposed). Brush your crust with your egg yolk glaze.
Bake until your crust is golden brown, 30 to 40 minutes. Remove from the oven, sprinkle with basil, and let stand 5 minutes before serving.

Tuesday, July 19, 2011

Blackberries Plus Cobbler Equals Yummm

While at church one sunday we made a great discovery and found Blackberry bushes out by the woods! At first we thought there were only a couple of bushes, but before long we realized they were everywhere! So of course we made plans to make a trip back up to church later in the week to start picking some!
After about 20 minutes of finger pricking and the scorching hot sun beating down on us, we decided we had enough. Not to mention I had to look out for my own safety with my husband acting like Rambo with him machete taking down every bush that didn't have Blackberries.
We used the blackberries to make a cobbler for a celebration lunch after church the following sunday and everyone really enjoyed the cobbler. Ultimately we were just glad to be share the berries we had found at the church with the church.